As you look at these projects that are spread out here on the bench.
Would you believe they’re all done on the same tool? That tool is the wood lathe.
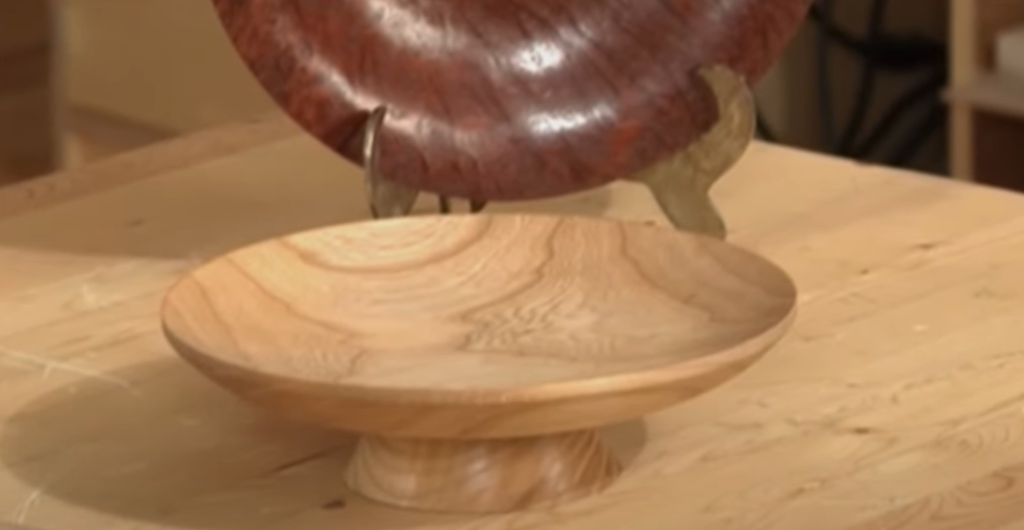
They were all turned from squares and larger chunks of wood into these shapes.
You see here, salt and pepper, shakers platters lamps. These are all things you can live.
Intro to Wood Lathe
It’s a way you can express your artistic side of woodworking if you will so, let’s take an introduction to the wood lathe.
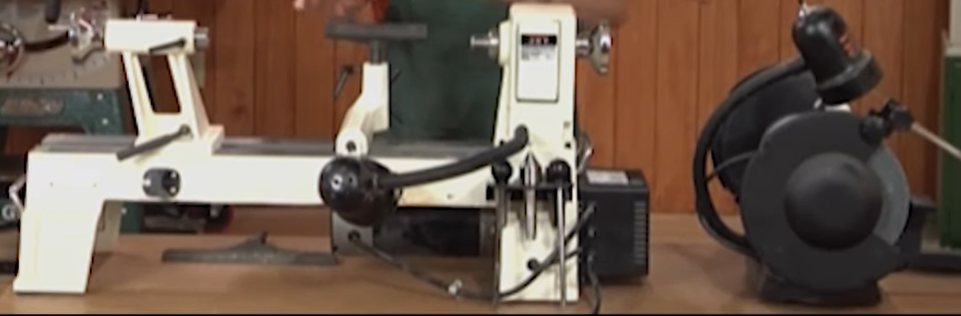
The lathe is really a fairly simple machine. You’ve got this long bed, here iron bed. Underneath this is the motor.The motor drives the headstock,there’s a set of pulleys down here and then up in the headstock connected by a belt, similar to what you’d find on a drill press and when you flip On the motor, the headstock spins.
You can adjust the speed on the wood lathe, that’s similar to what you do with the drill press by changing the position of the belt on the pulleys. This particular model has very nice.
It has a variable speed on it. So once you set the pulley speed, you’ve now got a range you can adjust it in, so you can dial it to the slowest in that range or pick it up to a little faster gives you a lot of flexibility as you’re. Turning to find the speed that works best for whatever tool you’ve chosen.
Tool rest
This is the tool rest .Tool rest is where your tools rest as you’re turning it gives you a place to embrace things, keep it steady as you’re working it slides along the bed and locks in with this lever, stay in position, and then you can adjust the position of the tool rest up and down.
Typically, you want about on center. For the object that you’re turning or slightly below most ladies will come with two to arrest. This is a shorter one and a longer one.
Longer one handy if you are doing some spindle. Turning where you need to have more travel for the tool, you don’t want to keep positioning the tool rest, so you can work this full length here or if you are doing some face. Turning on something wider, you can again work this whole distance,Instead of having to readjust a smaller tool arrested.
Tailstock
This is called the tailstock. Tailstock slides back and forth when you’re doing spindle turning a blank Mouse between the headstock and tailstock and then spins between these two.
Spur Center
The way you mount items for spindle turning typically you’ll use. What’s called a spur Center, you can see why it’s called a spur Center. It has little Spurs in a very sharp point at the center and prepare a turning blank by just drawing diagonals from corner to corner, to find the center. Then, with impact device just drive. The spur Center in there just enough to seat it.
This will go into the headstock, the tailstock end. Just another pointed Center, simply slides in to the tailstock. Give yourself plenty of room here. Now that’s in the headstock and I’ll bring this up so that the point again intersects my center point ,lock the tool rest in place.
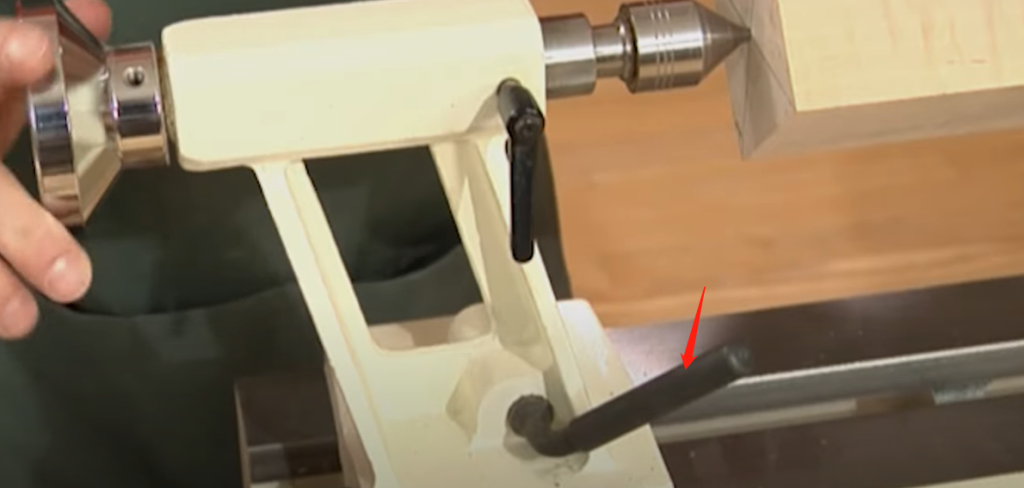
The tailstock has some travel in it. So, as I turn this crank, tailstock is driven forward that drives that Center into the blank, and now we’ve got some pressure to love that piece stays put.
So now it looks like we’re just about ready to turn. Position your tool rest. It’s just a little below center. You want to check that your turning is clear of the tool rest. I’ve got some more room here. I can bring it close upon close, you certainly don’t want it touching as it spins and lock it in place.
The Returning Tools
Let’s take a moment talk about some of the tools that you can use returning.
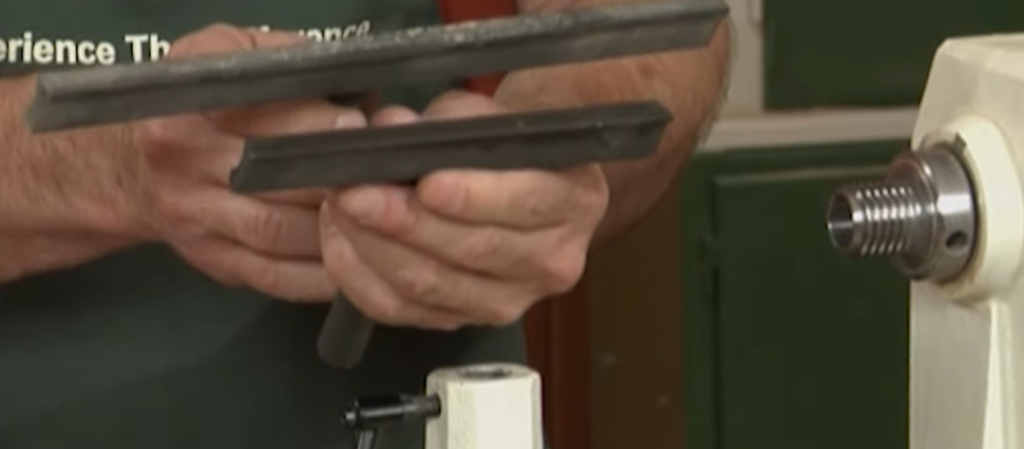
There are a lot of tools available for turning catalogs are filled with all kinds of specialty tools.You can really get by with a starter set that consists of four tools.
Roughing Gouge
This is called a roughing gouge, it’s heavy beefy and, as its name suggests, is for roughing out is we’re taking this rectangular block roughing off the corners and getting it close to cylindrical.
Parting Tool
A second tool in your basic set, what’s called a parting tool.Just narrow? It’s a sharpened down to a point and it really has a couple of uses.

The name comes from the fact that when you get done with a spindle, you may have some waste left down here at the end, and you would simply push this in to cut away the waste and part the spindle from the waste separate it from the waste.
Parting tool can also be used to mark locations on your blank that you want to turn to a particular diameter.
So if I want to bring this to two and a half inches in diameter, I would simply turn this down. Then use calipers to gauge two and a half inches, and I can mark various points on a spindle.
Bowl Gouges
For bowl turning when we actually do face plate turning, bowl gouges are the next tool you’d want.These are easy for rolling and shaping inside and outside curves on bowls.
Spindle Gouge
There’s a spindle gouge much smaller gouge, much finer for doing finer work, kind of detail, work in spindles.
These four tools are a good starting point for your turning as you get into turning and discover what types of tourney you really like, then you can expand your tool collection as your needs warrant. So, let’s actually do some turning here.
Remember a Face Shield
Recommend a face shield for this chips are gonna fly, and it has been known occasion that a blank will separate from the wood lathe you want to be protected from that. So a full face shield is a good idea.
How to Made Close to Cylindrical
I’m just gonna rough off the corners here to show you how the roughing gouge can be used to bring this close to cylindrical.
Spindle Turning
When you first start turning, not some scrap and try each tool to find the angle and the height that works best.
Here the tool rest is in line with a centerline of the blank, so the gouge touches just above its center, and the gouge is skewed to one side slightly. As I slide it along the tool rest, it chips away at the corners, don’t get too aggressive with these first cuts though.
Looking from above you can see the shoulder starting to form where the rounded portion meets the still square portion of the blank.
Hold the tool handle firmly in one hand and brace your arm against your body, but don’t tighten up stay relaxed grip. The tool blade with your other hand and use one or two fingers to guide it along the tool rest. You can hear the difference in the cut as the blank gets close to cylindrical. It’s a continuous cut now, instead of the chattering hit and skip of earlier.
I’ve switched to the parting tool now to define a diameter on the blank I made an initial cut. Then I checked my progress with a pair of calipers. You know I’ve still got a ways to go so I’ll cut a bit deeper then check again.
Once the calipers fit in the groove I’ll use my spindle gouge to create a smooth transition on either side of that reference cut. You’ll find that tools work differently as you roll them pivot them and change the angle at which they address the blank play with them all find out what works best.
One thing I really like about turning is how fast sanding goes just let the blanks pin and hold sandpaper against it. So that’s the basics of spindle turning.
Face Plate Turning
Let’s move on to face plate turning, get rid of my sample piece here to switch between the two I’ve got to remove my Center from the head and tail stock and there’s a rod that comes with your lathe just goes through there and you give it A tap lock those loose – you got a handy little storage rack right there for my faceplate turning.
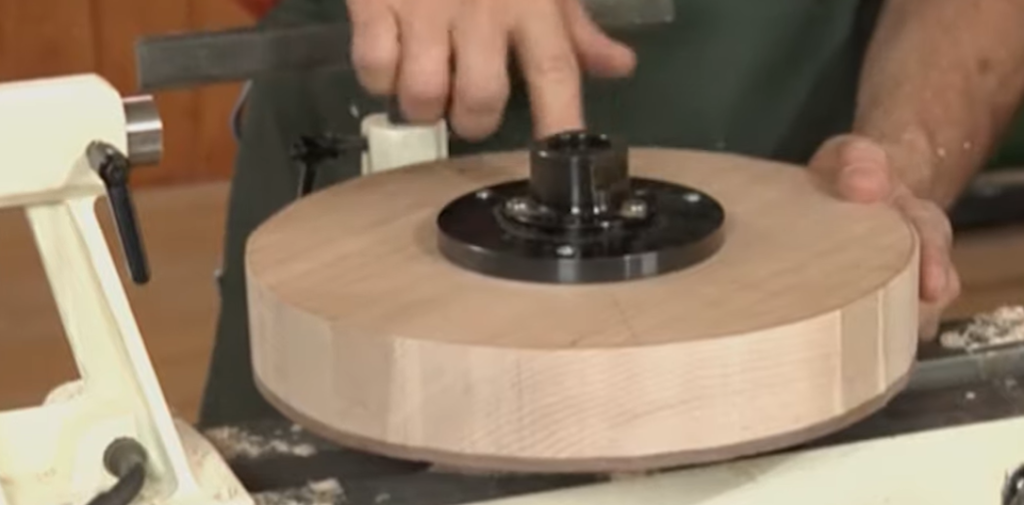
You’ll have a blank. This one I’ve already rough cut round and it’s mounted to the faceplate the to mount. This you’ll have a hole drilled in the center of your blank, then, with little brute force, you’ll screw the faceplate down into that hole and then secure it with three screws.
Now. Obviously this leaves some holes in your project, but you want to make sure that you put this amount, the faceplate in areas that will be turned away as the project develops once the faceplate is in place. It’s threaded on the inside and it threads on to the headstock。
With faceplate turning typically the first job is to true up the blank that is turn it into a true circle. This also helps balance the weight of the blanket of spins. The roughing gouge handles this job with some gentle rolls back and forth to be in hollowing a bowl.
I use a bowl gouge, you always work to the left of center, so the rotation of the blank presses the tool down on to the tool rest on this particular blank I’ll cut, just through the quarter inch thick walnut layer to reveal the maple below. So that’s the basics of faceplate. Turning now there is one more way you can mount things on a faceplate.

Remember I mentioned how putting a screw mount some screw holes into your blank means. You’ve got to turn that area away. You’ve always got some holes in your blank that have to be dealt with, there’s another way to mount stock that doesn’t create any holes, and that is called a four jaw Chuck. I’m gonna use this project as an example. This is a platter, sits on a pedestal in the bottom of the pedestal, or on the top of the pedestal.
There is what’s called a spigot and that spigot fits into a recess on the bottom of the platter. So this was turned it’s all completed. Now, there’s no sign of how this was mounted on the wood lathe. There’s no screw holes of any type, because this was done with the four jaw Chuck。
Four jaw Chuck mounts on to the headstock, just like your screw mount and then using this wrench, it’s kind of like a drill press Chuck. You can turn this to expand and contract.
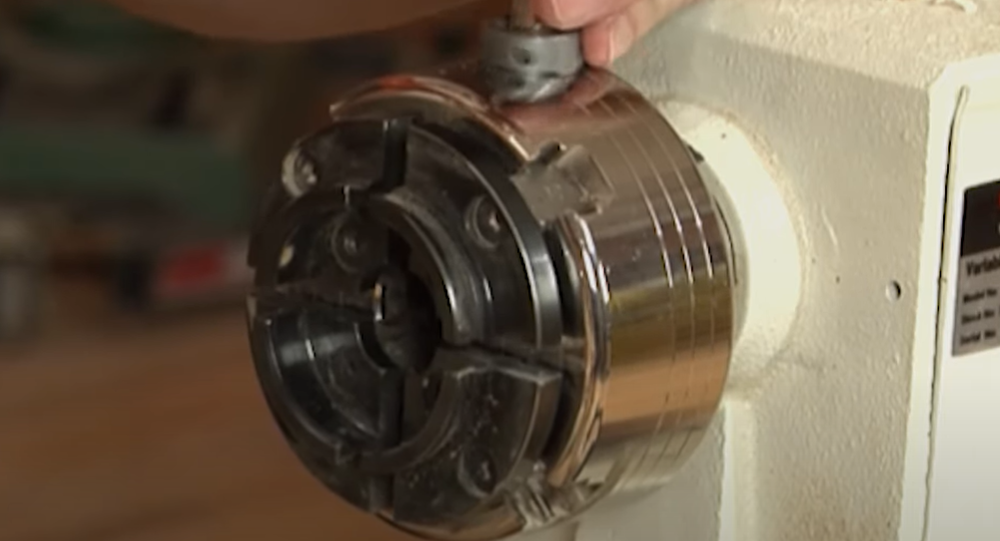
These jaws in the case of this spigot turn the spigot on that piece and then clamped it into the four jaw Chuck. Now it’s firmly gripped. You can bring the tool rest around and turn your workpiece to the shape that we show here and then, of course, bring it to the front and then hollow out the bottom.
So that’s how a four jaw Chuck grips a spigot and you can do just the reverse: to grip a recess. It’s dial is down here so when spent of contracting around a spigot, you can expand it out into that recess.
This is firmly gripped. Now you come in and you can shape this side .Now there is one more tool: that’s really critical to your success at the wood lathe. You must have sharp tools. That’s the only way to really get clean cuts.
For sharpening your tools, you can get distal to slow speed, grinder a relatively inexpensive way to get into sharpening this one has a rough wheel on one side and then on the other side, the wheel.
You use most often for the touch-up sharpening. This is an aluminum oxide wheel and it’s nice to have the grinder sitting close to your lay like we have them here, so that as you’re working and a tool gets dull, you can just step over here, turn the grinder on and do a quick touch-up on An edge bringing it back to working sharpness and then step right back to work.