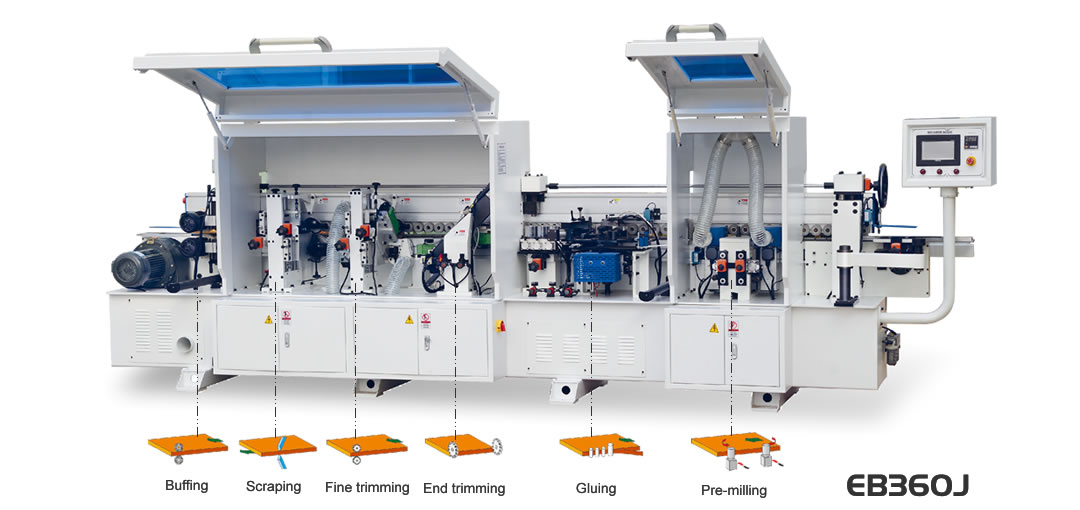
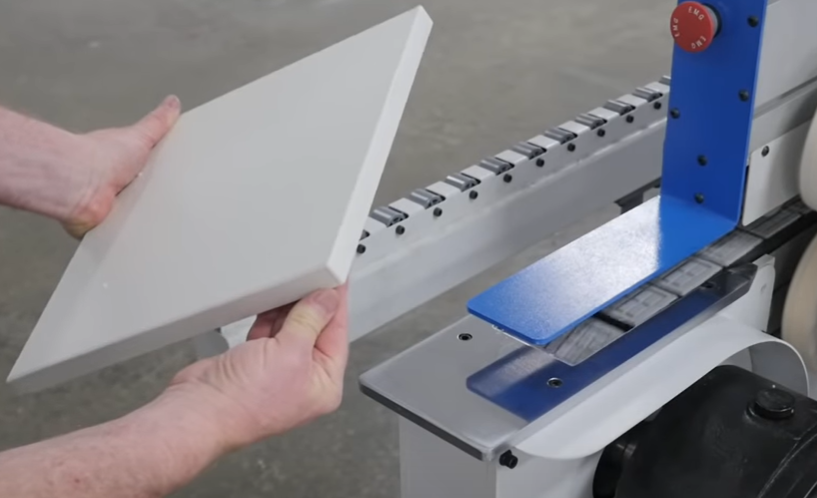
We’re gonna have a deep look here at our new line of edge banding machine that we’re really proud of.

We’ve got the band at 3 and 4, and here today we have the band at 5. This will be our new flagship model.
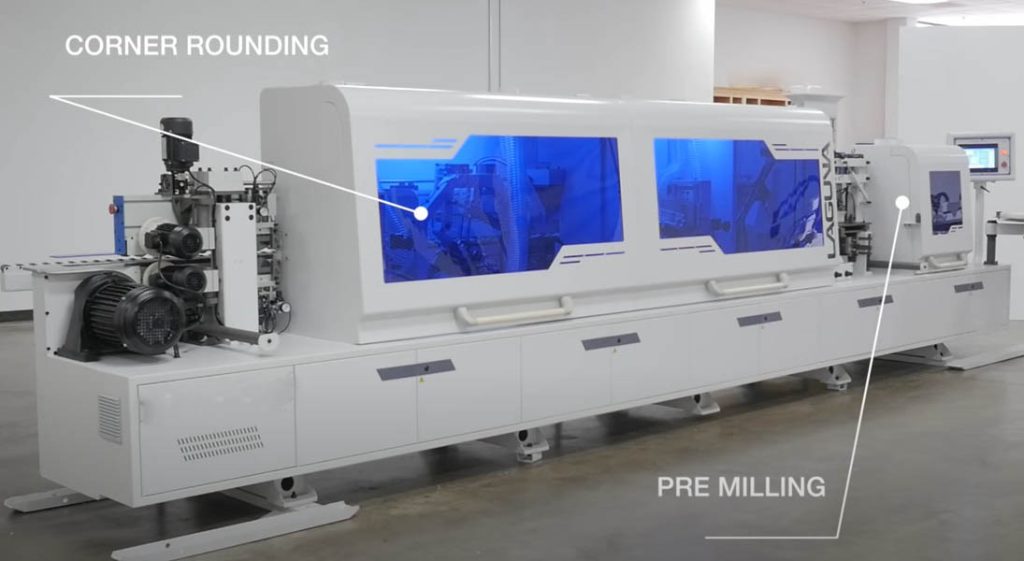
We’re really proud to introduce this model, as it has features like corner rounding and premilling, along with the other features that you’ve come to expect from a Winmax edge bander.
Let’s have a look at all the stations here. We’re going to open it up, have a look at all the stations and then we’ll run a few boards.
Pre Milling of Edge Banding Machine
Our first station is the premilling sensation.

This allows you to get the perfect edge on the board before you apply your tape and glue.
There are two counter-rotating shaper cutters inside. And there’s independent control and independent air cylinders for each station.
Feed Belt Side of the Edge Bander
Now we’re here at the feed belt side of the edge bander.
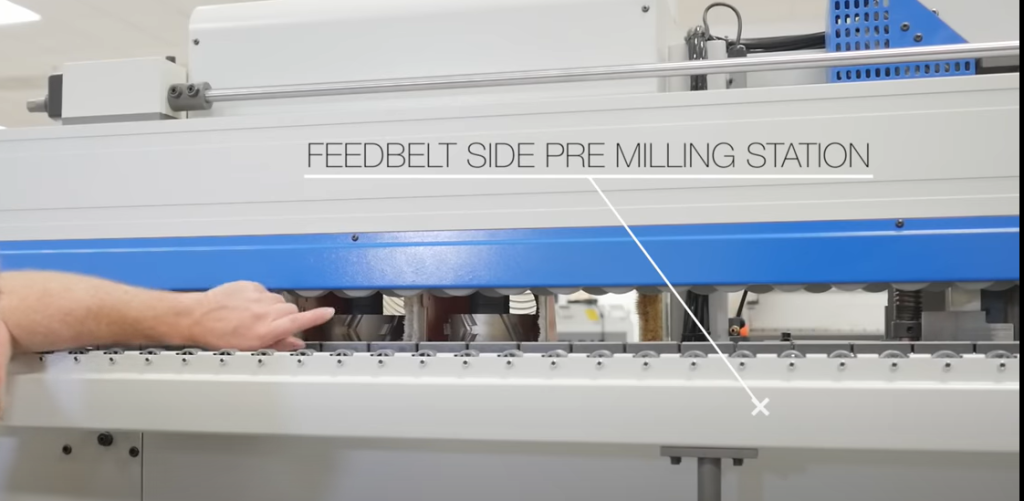
So we can have a close-up look here at the pre milling station.
This is the entire Premal station right here, and it’s got two cutters for the pre male.
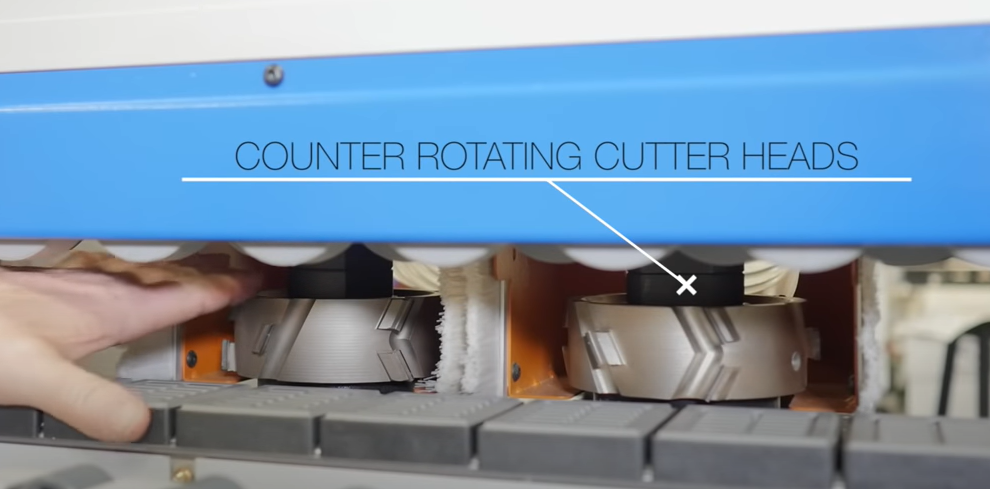
And they rotate in opposite directions our counter rotating. The reason for the counter rotating is so you can reel the front edge and the back edge of the panel without any chip out or any tear-out at all.
Glue and Tape Application
The next station right here is the glue application and the tape application.
Those come together in one station right here. They’ll be a rough trim, a series of pressure, rollers you’ll see that there’s a feed roller here for the tape.
Tape
The tape will come across through to the tape tray area, we’ll have the tape tension.

This will be our height setting for the thickness or that or the width of the tape right here. This will limit that.
Rough Trim Guillotine
Next is the rough trim guillotine, and this will go through and cut the tape and allow you to go through and keep feeding the material through the edge bander machine.
Pressure Rollers
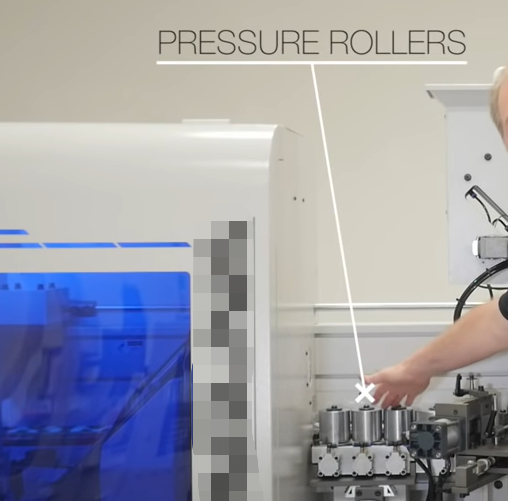
Finally, we have a series of pressure rollers.
- First off is the large diameter pressure roller so that that tape can make the turn.
- Secondly, we have a series of three smaller rollers that press that tape into the glue and into the edge of the panel.
- Now each of these, as independent controls, are all pneumatic controlled. Your setting for your tape thickness is right here.
And then you have pressure settings at the bottom here for the application rollers and for the guillotine.
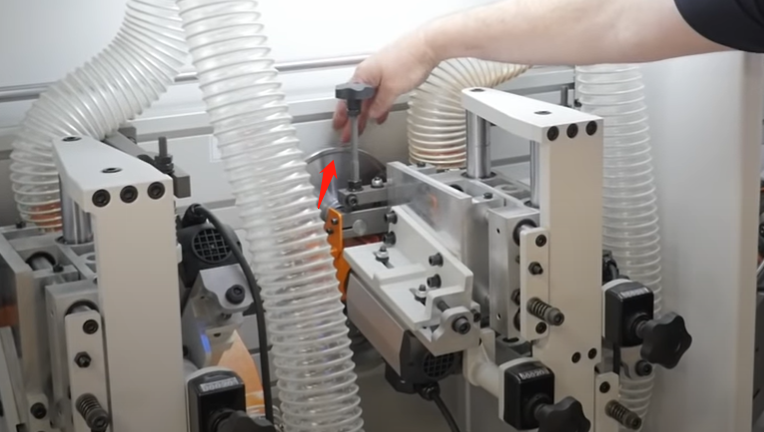
Cool Feature
There’s one cool feature here after the pre milling.
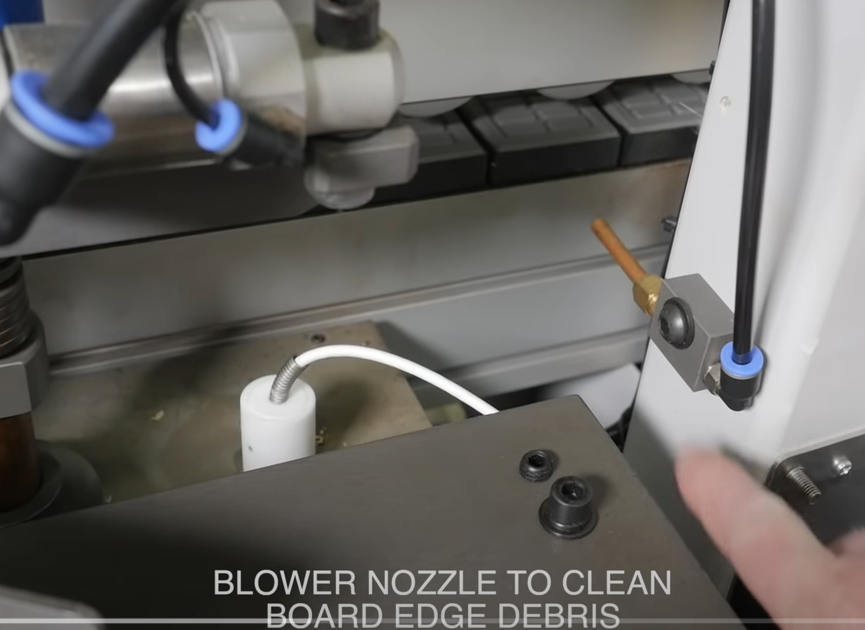
But before the gluing station, this little nozzle as your board leaves the pre mill.
It could have a little bit of debris on the edge of it that nozzles are designed to blow the edge of the panel, get it cleaned up and ready for the glue application.
Hot Melt Glue Pot
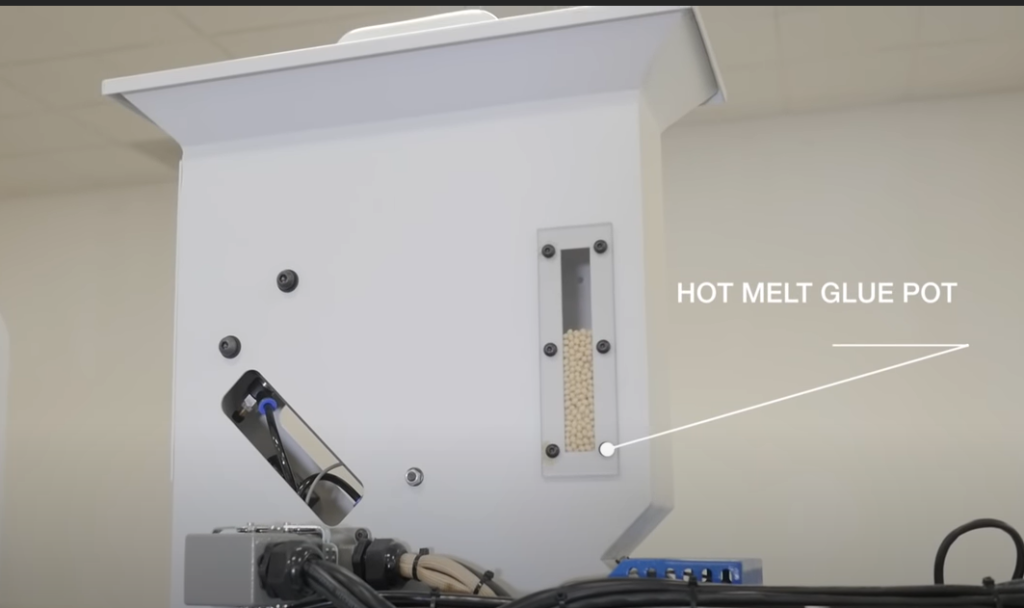
Now we’ve talked about the tape feeding in the other important part is the glue, and this is a hot-melt glue pot.
It’s comprised of this entire gluing station right here, which is kind of high-tech.
You’ve got your glue pellet reservoir right here, and fill this from the top.
You also have a sight glass, you can tell how much of the glue pellets you have in your system.
There’s a pre heater, which heats the pellets on their way down and there’s an automatic feed system that will feed this down for you.
The glue then travels down into the glue pot itself, there’s another series of heating elements inside and finally, the glue is lifted up to the application roller.
As that rotates, it’s got the knurled edge on it. That’ll actually hold the glue on it and, as your panel is coming through, it’ll apply the glue to the edge of the panel.
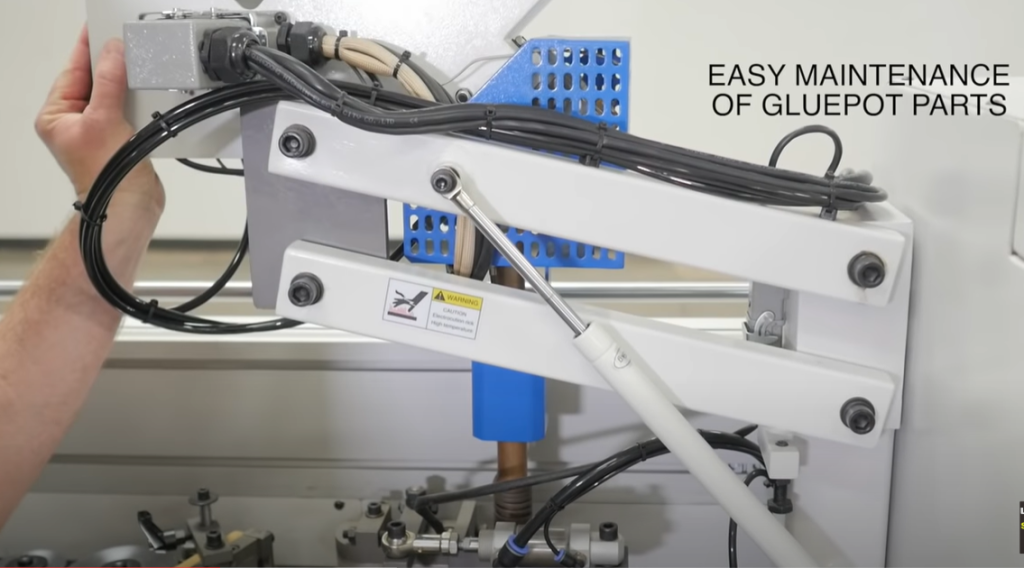
And then finally the tape comes in and applies the glue. Now service in this glue pot is very easy.
It’s on a pneumatic cylinder right here and an articulating arm. It allows you to go through and to pull this up, get in and clean and service a glue pot quite easily.
Front and Rear Edge Trimming
This entire compartment in this door is the first stage of the milling stations, will have front and rear edge trimming. We’re gonna have the top and bottom trimming. There’s two different stations.
This bander machine can go through and do tape up to three millimeter.
And so for the 3 millimeter there’s a heavier milling station for your PVC,your point for up to your two mill. There’s a lighter trimming station here as well.
Automatic Lubrication
Now, before we talk about the in trim station, let’s have a look at the automatic lubrication.
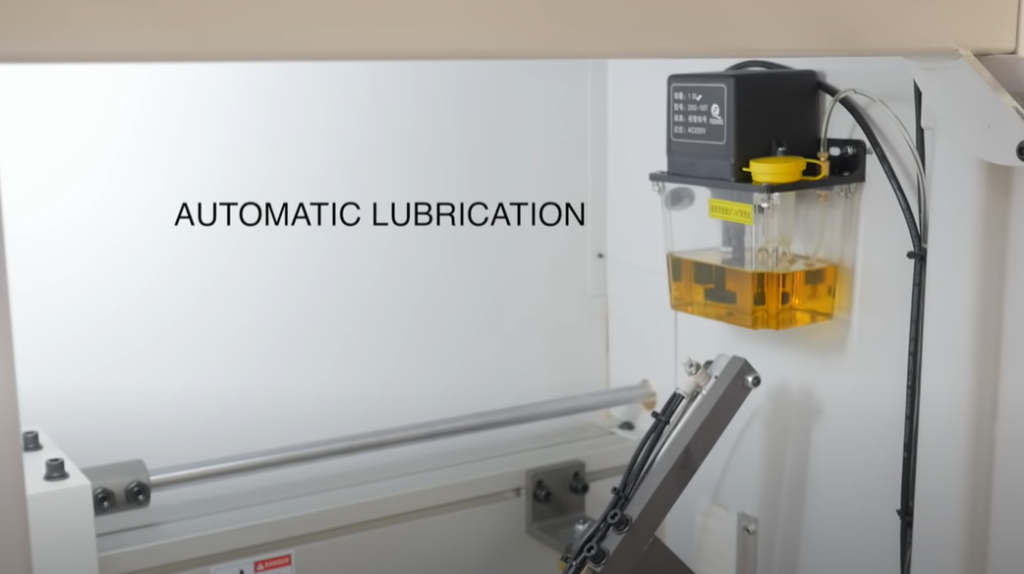
This is centralized automatic lubrication and it will send oil throughout the lines here throughout the entire automaitc edge banding machine to go through and reduce your maintenance needs.
Front and End Trim Station
Now the next station is our end trim station.
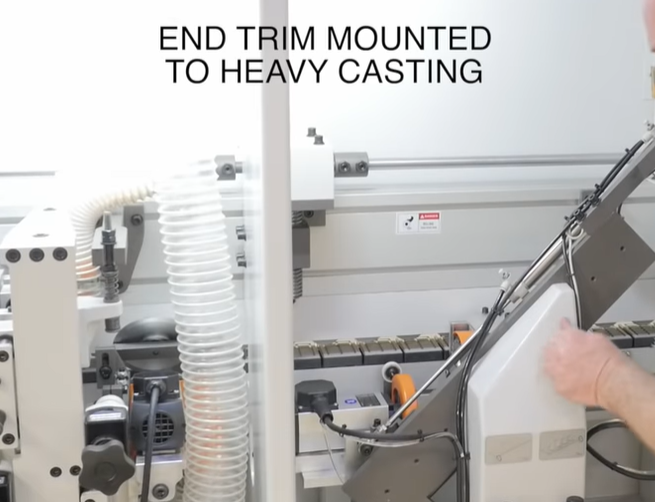
It’s mounted to this heavy casting and that makes sure that it’s stable and accurate. The motors are independent, high frequency motors.
There are two motors that run these carbide tips of all saw blades. That trims the front and rear edge of your tape as its passing through the bander machine.
These are independently controlled and they’re on independent slides, so they can hit the front edge and the rear edge of your panel as it’s feeding through. Whether you have a long panel or a short panel that gets trimmed very quickly. These allow it to keep up.
Top and Bottom Trimmers
Now that your panel has the tape trimmed on the front and back edge. We need to trim the top and bottom of the panel, and we have two dfferent trimming stations right here.
Flush Trimming Station
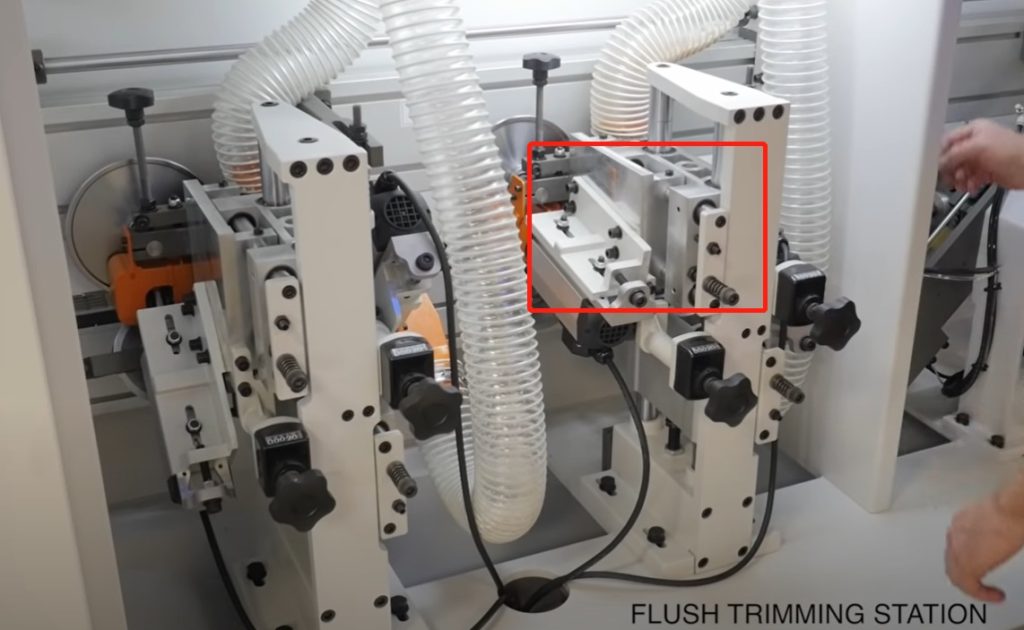
The first one is for your tapes that are going to be trimmed flush without any radius.
You’ll see in here that we have carbide tip cutters.
These are shaper cutters with insert carbide knives on them, and this will trim the top and bottom of the panel flush.
Now these are floating heads and they’ll move up and down, and in and out, along with your panel.
These guide rollers right here will go through and make sure that the tape trimming is done precisely to the thickness of your panel.
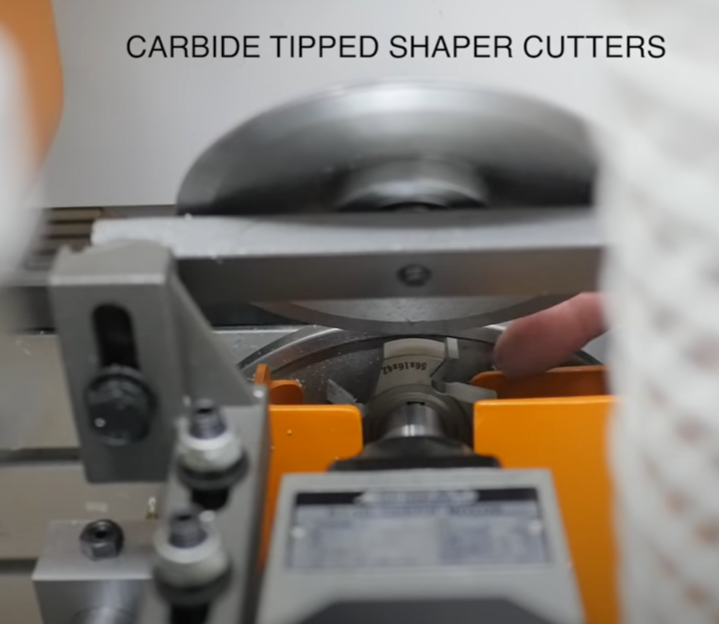
Second Trimming Station
Now this is the second top of bottom trimming station. You’ll run the edge banding machine with either one or the other one running.
When you’re running thick tape, like the three mil tape you’re going to want to have that radius on the edge and that’s what this trimming station does.
It has the same high frequency motors that we have on the other trim station, and that gives you plenty of power with low power consumption, and it also provides plenty of power for these shaper cutters.
These shaper knives here are radius, and this is what creates that rounded edge on the three mil product.
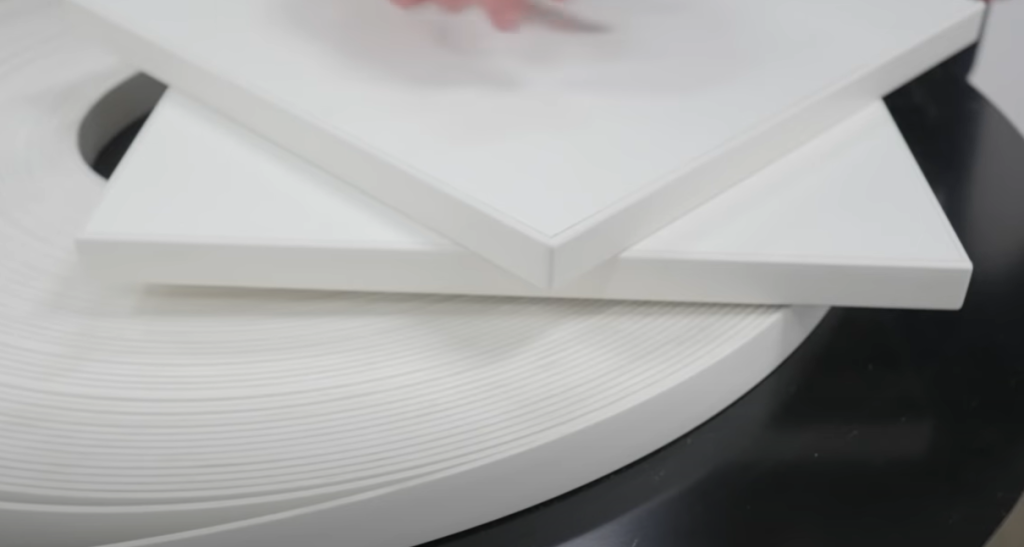
Corner Rounding Station
It’s my favorite station on the entire edge banding machine. This is the corner rounding station. Corner rounding is used only for three millimeter products.
Your three mill tape is quite wide and if you did a butt joint, where you’ve got tape coming up the front and along the top.
It leaves a really ugly looking edge and what we want to do is around it and make it look nice. Just like we have the radius on the edge of the tape.
We’re going to have it on the front and rear edge as well.
Cutters

You’ve got two different cutters here again, high frequency motors again carbide tip shaper cutters.
These have the same radius that you’ll have on the top and bottom of the panel.

Now these have a lot of linkage here, pneumatic cylinders because they need to move up and around the panel to get that corner rounding done as your panel processes through.
These are controlled independently. You may want to have a corner running on the front edge, but not on the rear edge.
Or on the rear edge and not the front edge, or you want to have them both done and that is controlled through the control panel. That we’ll have a look at a little bit later.
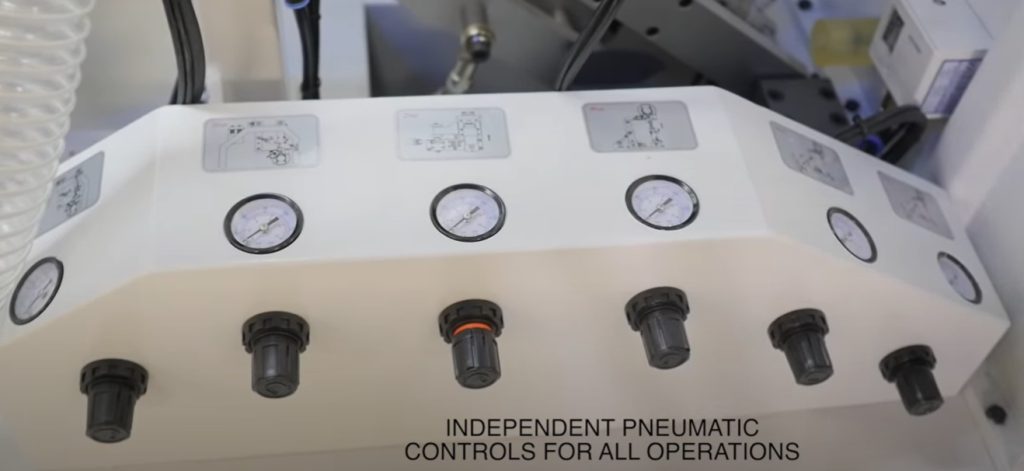
You have the pneumatic controls right here.
This allows you to go through and independently set each of the pneumatic controls for these cylinders to give you the best product available.
You can see that there’s a wide range of motions on these and a nice beefy stop right here now.
Scraping Station
The last station inside the main cabin here is going to be the scraping station.
And again this is a three millimeter station because it has radius nine, so they match the radius that we used on the shaper cutters up ahead here.
Scraper
What happens is that when you’re milling these with the shaper cutters, you’re going to have some really fine little mill marks. And you might see that in the finished product.
So the scraper goes through and it matches the radius. It scrapes the edge of that.
Dust Collection
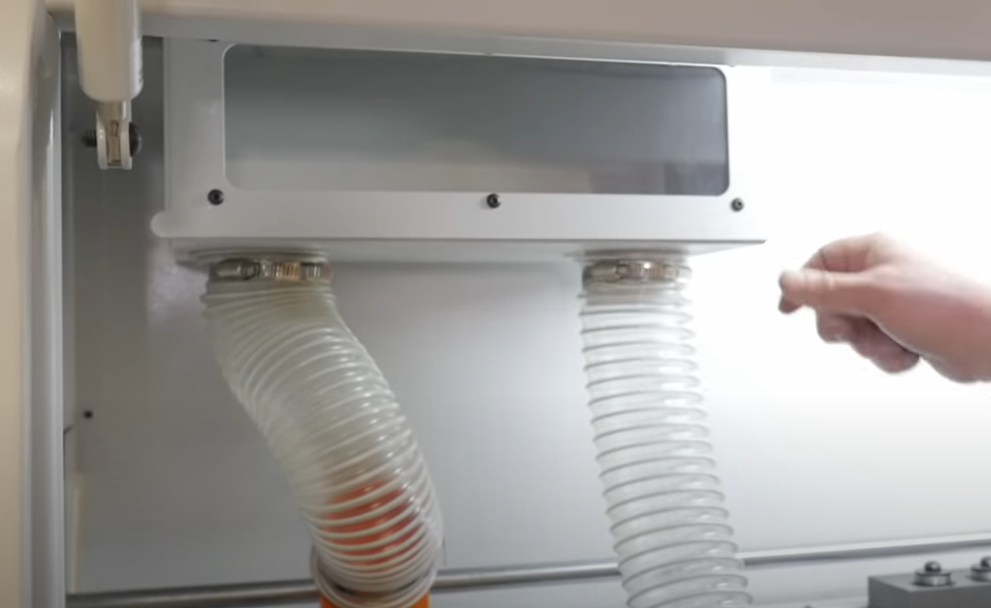
The collection for the collection goes up through this collection box.
Because you’re scraping these, you might have long little strings of those strings can get caught up in the dust collection.
So they go up into this box right here that you’ll clean out periodically makes it cleaning very easy.
Spring Loaded
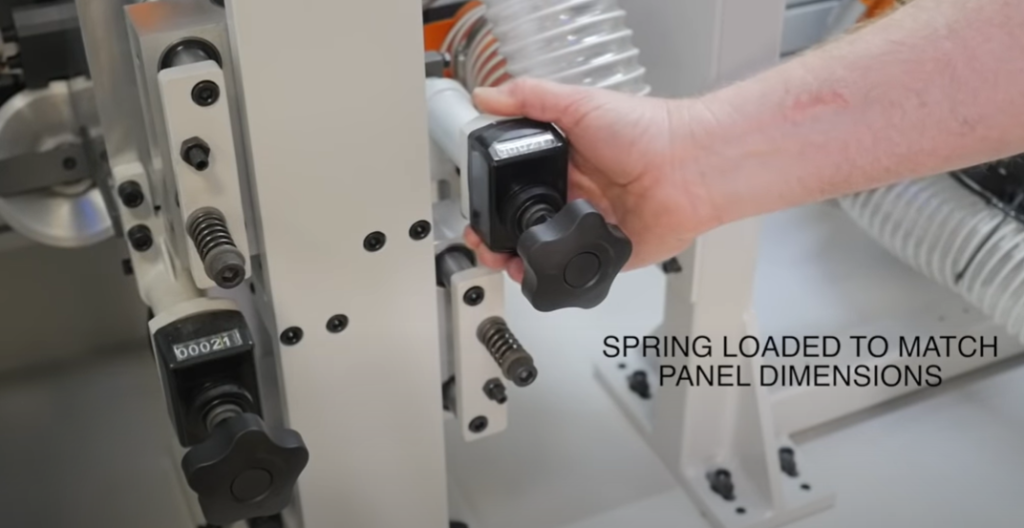
The other thing is again these are spring-loaded.
They’ll move in and out, up and down just to match your panels. They have the same copy pad rollers that you’ll have on the other stations.
The entire cabinet is enclosed and has the baffles between the stations. And then finally we’ve got the sound absorption material, the inside just to reduce that noise signature in your shop.
Scraping Station
Now we cover the scraping station for the three mil product.

But for your smaller tapes, your point for up to your two flush edge trim, you’ll use the scraper in the back.That has just a flat knife.
These are a standard fourteen millimeter carbide insert knife, and it has the blower’s right here next to it. So, as the panel is coming through, it’ll scrape the top and bottom edges to make sure that they’re perfectly done.
Again, these are floating heads, they have pneumatic pressure on them and they have the blowers to keep everything clean.
Buffing
Now, as we step through the edge bander. We’re finally at the end.We’ve got the tape applied,the front and rear edge, trimmed, the top and bottom trim,the corners are rounded.
Finally, we need to come through and polish it up and as you’ve gone through all these processes that edge could get a little bit dull.
Buffing wheel

Finally, we’ve got two buffing wheels right here. These are independently controlled, so you can have them on or off, depending on the type of tape that you’re running.
These will go through and restore the luster to the edge of your tape.
Feed Motor
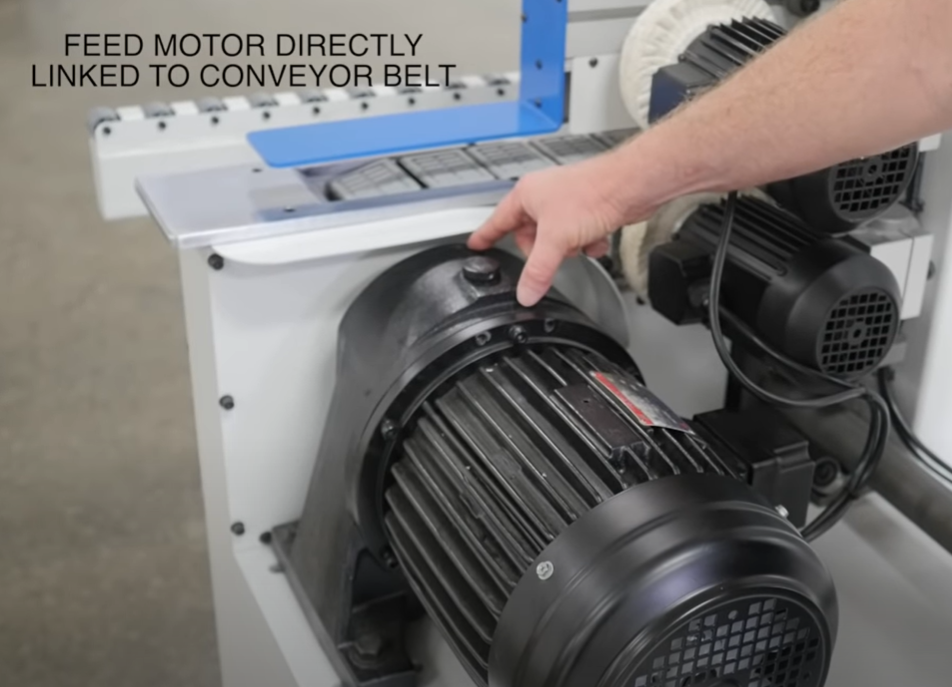
Now, while we’re down here, we’ll have a look at the feed motor.
This feed motor is directly geared in to the link belt and that’s what’s been pulling the panel through all of these processes.
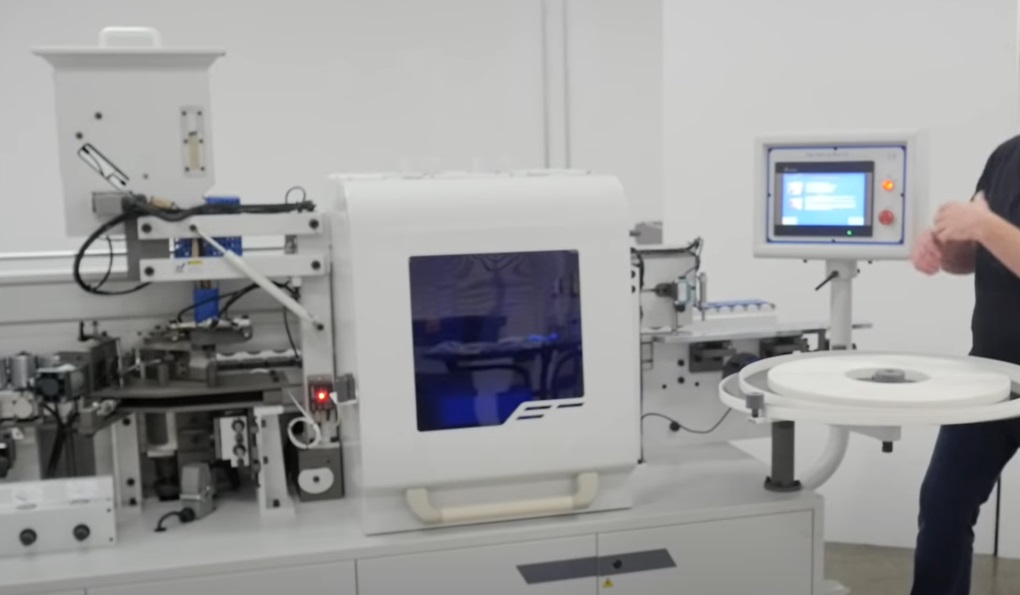
The Operation of the Edge Banding Machine
Now we’ve had a look at all the stations of the wood banding machine, we’re going to move up here to the operations into the edgebender machine.
Tape
The operator is going to go through and put the tape on here. And then most important they’re going to be using the control panel.
We’ll go ahead and start this up and as it’s going through its warm up and boot up stages here, we’ll talk about tape.
You’re going to go through and put your tape here, and you can actually set some of the tape adjustments on the screen.
It’ll flash up here that we’ve got lagoona tools on the screen.
Low Air Pressure Warning
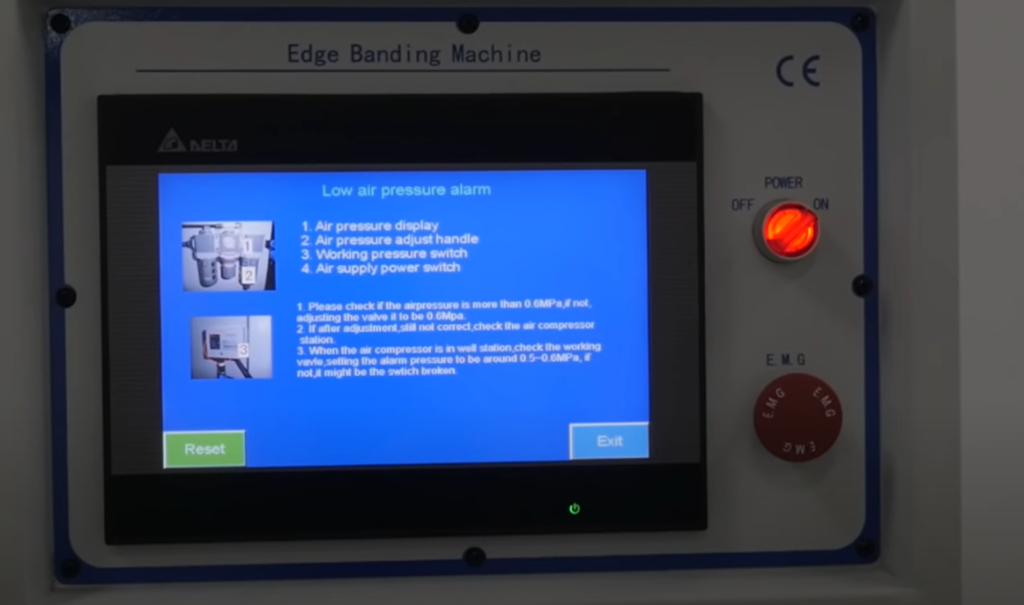
Now we’re gonna get a warning here.
This is the low air pressure warning.
Now I haven’t turned on the air to the edge bdning machine yet.
Because I wanted to show the alarm. There’s a few alarms that’ll come up if the machine’s not ready to use.
If I turn the air pressure on, then I can hit reset and then the aotumatic machine will be ready to operate. Or I can simply bypass this right now to get to the next menu.
This is the tape menu, so we talked about putting a certain amount of tape on here.
Let’s adjust the amount of tape forward and after the panel. You’re gonna have a little bit of overhang that you need and you can actually adjust that Right here.
Door Open Alarm
There’s another alarm,similar to the low air pressure alarm that you might see. That’s if you have a door open during operation, we’ll go ahead and get the door open up here.

You’ll see the alarm pop up, this alarm let us know that we have either an e-stop button that’s pushed.
Or one of the door switches it’s pushed.
You’ll see that there’s micro switches on each of the doors.
That’ll prevent you from writing the edge baner machine. Now you can go through and reset the banding machine,shut the doors.
Suggestion
Right now we’re going to exit through this, so that we can get to the other menus. But make sure that the doors are closed or in operation.
During this video we may have those switches by pass you can see some of the operation, but make sure that those switches are up and running when you’re using the edge banding machine.
Control Panel of Edge banding Machine
Now that we have our glue up to temperature. We’re gonna start running some boards and walk you through the control panel.
There’s a few things to look at.
Speed Control

We’re gonna be running three millimeter tape, which runs on the low setting.
This is where we’ll change the speed for the track feed on it.
We can go low, medium and high .
We’re going to leave it on the low setting here and exit that screen.
Pre milling Control
The pre-mill has two different controls here, one for the infeed and one for the outfeed preiller.
If we can get those turned on will start turning on the glue right now, that’ll get the glue roller agitating, stirring the glue pot and start pumping glue through the system.
Turn On the Button
- We’ll go through and turn on the front and rear edge trimming units.
- We’re gonna use the fine trim, which is going to be the rounded edge for the three mil product.
- We’re gonna go through and use the corner Rounding on the second pass, not on the first pass and then what we’ll do is we’ll also have the scraping unit on as well.
- And then finally, the buffing unit.
So let’s go ahead, get these all turned on and we’ll run some products through.
Products Through the Edge Banding Machine
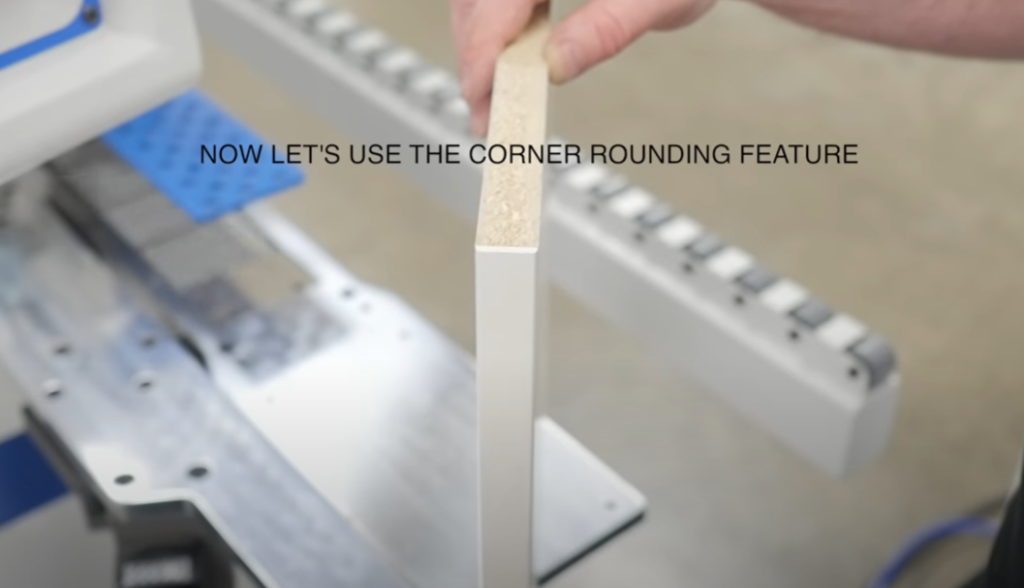
Now that we’ve got the first edge on.
We’re gonna apply the second edge and going to use the corner rounding feature.
So we’ll need to turn that on right here.
That’s a beautiful corner!
Now, when running multiple boards through, you can’t feed them nose to tail. You have to have a little bit of space in between and to adjust that space.

There’s a small cylinder right here.
This little air cylinder will come down, so you can’t feed the next board until it’s ready to go.
And that gives the Machine the space in between to operate to the end trimming operation.
Before that edge finish, is just amazing here on this three millimeter edge banding.
If you’re doing two millimeter edge banding or some thin tape, and you don’t need the corner rounder prevailing.
You can pick up our bandit three bandit for those are some great edge banding machines. If you’re doing the three mill come over here to the bandit, five it’ll serve you well.
If you need more information on this edge banding machine or the other edge, banners give us a call toll free at +86 1812660262, or look us up on the web at working-machinery.com.